
Goku, the main protagonist of Dragon Ball, is one of the most iconic characters in anime. His bold personality, strong moral code, and determination to become the strongest warrior in the universe have captivated fans for decades. One of the best ways to celebrate your love for Goku is by drawing him. Whether you’re a novice or a skilled artist, this guide will help you break down Goku’s features and understand how to capture his iconic look on paper or digitally. Follow along, and you’ll be able to create your very own Drawing:htlx3r6h6au= Goku that’s both accurate and full of personality!
Understanding Goku’s Iconic Look
Before we dive into drawing Goku, it’s essential to understand the features that make him stand out. From his fiery hair to his determined facial expressions, every element of Goku’s appearance plays a role in defining his character.
Goku’s Hairstyle
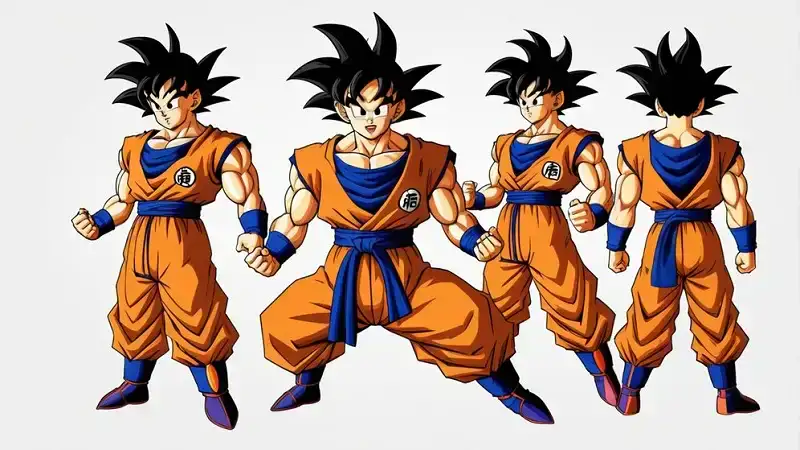
Goku’s spiky black hair is perhaps one of the most recognizable aspects of his design. His hair defies gravity, shooting upwards in sharp, defined spikes. It’s essential to take your time when drawing this hairstyle because each spike needs to feel dynamic and alive, just like Goku himself. The spikes should have variations in direction and length, creating a chaotic but balanced look. Goku’s hair isn’t just static—it flows with his movement, giving him an energetic appearance.
Goku’s Facial Features
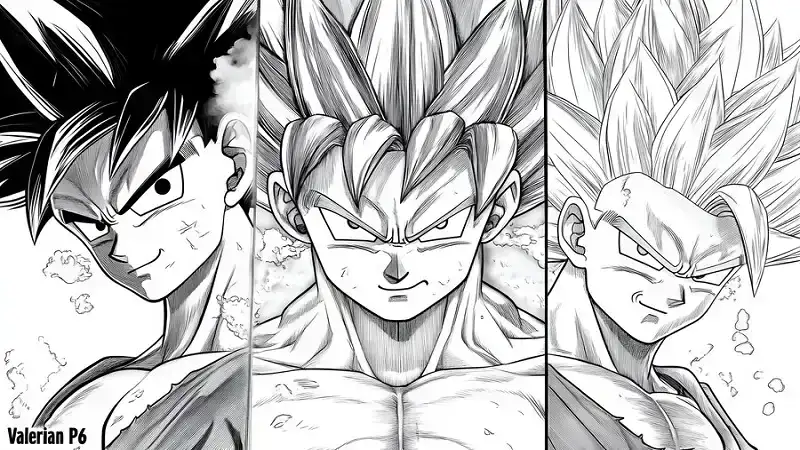
Goku’s face is a blend of strength and friendliness. He has large, expressive eyes that often display his determination and courage, along with a slight smile or serious expression. His face is slightly angular, particularly around the jawline, making him appear tough but approachable. Don’t forget the three signature lines under his eyes, a subtle but essential detail that adds depth to his character design.
Choosing Your Drawing Style
There are many ways to draw Goku, and choosing your preferred style is crucial for how your drawing will turn out.
Anime Style vs. Realism
You can choose between a faithful recreation of Goku in the anime style or experiment with a more realistic portrayal. The anime style emphasizes clean lines, sharp features, and bold colors. If you opt for realism, you’ll want to focus more on shading, textures, and detailed anatomy to bring Goku to life in a more human-like form. Each approach has its challenges, so pick the one that excites you the most!
Finding the Right Reference
When starting your drawing, it’s always a good idea to find a reference image of Goku. Look for high-quality images from different angles, which can help you understand the structure of his face and body. Having multiple references is useful when you need to see how Goku looks in action, or how his clothes move in different fighting poses.
Materials Needed for Drawing:htlx3r6h6au= Goku
Whether you’re drawing on paper or using digital tools, the right materials can make a big difference in the quality of your work.
Pencils and Paper
For traditional drawing, you’ll need a set of pencils with varying hardness. Use harder pencils (like an H or 2H) for lighter sketches and softer pencils (like a 2B or 4B) for darker outlines and shading. A smooth, high-quality paper can help you capture the fine details without smudging too much.
Digital Tools for Drawing
If you prefer drawing digitally, software like Adobe Photoshop, Procreate, or Clip Studio Paint is great for replicating hand-drawn effects. A graphic tablet and stylus offer precision and flexibility, allowing you to easily adjust lines and colors. Digital tools also make it easier to experiment with layers and effects, which can enhance your final drawing.
Drawing the Outline
Now that you’ve chosen your style and prepared your materials, it’s time to begin drawing.
Starting with Basic Shapes
Start by sketching out the basic shapes that will form Goku’s body. Use a circle for the head, lines for the spine and limbs, and ovals for the chest and hips. This basic framework will help you map out Goku’s proportions and ensure that everything is in the correct position. Keep your lines light and loose at this stage, as you’ll refine them later.
Refining the Outline
Once you have the basic shapes in place, begin adding details. Start with Goku’s facial features, placing the eyes in the middle of the head. Draw the nose and mouth below, keeping in mind that Goku’s expressions are key to capturing his personality. Next, refine the outline of the body, adjusting the limbs to make sure they’re properly proportioned. Don’t worry about adding too much detail at this stage; focus on getting the structure right.
Adding Detail to Goku’s Face
Goku’s face is full of expression, and drawing it accurately is crucial to making your artwork stand out.
Eyes and Expressions
The eyes are one of Goku’s most expressive features. They are large and oval-shaped, with sharp angles at the top. His eyebrows are often arched, giving him a focused or determined expression. Make sure to leave some space for highlights in the eyes to give them a lively, energetic feel.
The Signature Spiky Hair
Goku’s hair is a bit of a puzzle—there are lots of spikes pointing in different directions, but they all need to look balanced. Start by drawing the central spike that points upwards, and then add spikes on either side, angling them outward. Each spike should be thick at the base and taper into a point. This hairstyle is dynamic and exaggerated, making Goku look like he’s always ready for action.
Drawing Goku’s Body
Now that Goku’s face and hair are in place, let’s move on to his body.
Proportions and Musculature
Goku has a powerful, muscular build, and it’s important to capture this in your drawing. His chest and arms should appear broad and strong, while his waist should remain narrow. Focus on drawing defined muscles, especially in the arms and legs, as Goku’s strength is a key part of his character.
Clothing and Outfit
Goku’s outfit is simple but iconic. He wears an orange gi with a blue undershirt, wristbands, and boots. Pay attention to the folds and creases in the fabric, especially around the joints, as this adds realism and movement to your drawing. The gi should feel loose and flow with his body, especially in action poses.
Shading Techniques
Shading is essential for bringing your drawing to life and giving it a sense of depth.
Light and Shadow
Before you start shading, decide where your light source is coming from. This will determine where the shadows fall on Goku’s face and body. Use darker tones to shade areas that are further from the light, such as the underside of the arms or the folds in the clothing. Lighter tones should highlight areas where the light hits directly, such as the top of the head and shoulders.
Creating Depth
There are many ways to add depth to your drawing, but one effective technique is cross-hatching. By layering lines in different directions, you can create a sense of texture and volume. You can also use blending tools, such as a blending stump or your finger, to smooth out the shading and make the transitions between light and dark more seamless.
Coloring Goku
Adding color can make your drawing of Goku stand out even more.
Choosing the Right Colors
Goku’s outfit is bright and bold, so you’ll need vibrant shades of orange and blue. His gi is a bright orange, while his undershirt and wristbands are a dark blue. His hair is black, but when he transforms into Super Saiyan, it turns a golden yellow. Make sure to use rich, saturated colors to capture the energy of the character.
Blending Techniques
When coloring, try to blend your colors to avoid harsh lines between different shades. For instance, blends lighter and darker shades of orange in the folds of his gi to give the fabric more depth. If you’re working digitally, you can use gradient tools or soft brushes to create smooth transitions between colors.
Finalizing Your Drawing:htlx3r6h6au= Goku
Now that you’ve finished the bulk of the drawing, it’s time to add the finishing touches.
Review and Edit
Step back from your drawing and take a look at it as a whole. Are there any areas that need more detail or refinement? Sometimes, taking a break and returning to your work later will help you spot small mistakes or areas for improvement. Don’t be afraid to make adjustments!
Adding Final Touches
The final touches can make your drawing pop. Add small highlights to Goku’s hair, eyes, and outfit to give the drawing more dimension. These highlights, particularly in the hair and eyes, will bring your Goku to life.
Conclusion
Drawing:htlx3r6h6au= Goku is a rewarding challenge that allows you to explore different techniques, from capturing his iconic hairstyle to detailing his muscular build and dynamic clothing. With patience, practice, and the right approach, you can create a powerful, lifelike image of this beloved character. Whether you’re a fan of anime or simply enjoy drawing dynamic figures, Goku is a fantastic subject for any artist.
FAQs
1. What are the best tools for Drawing:htlx3r6h6au= Goku?
For traditional drawing, use a range of pencils from H to B for different shading effects. For digital drawing, tools like Adobe Photoshop or Procreate, combined with a graphic tablet, work well.
2. How can I improve my Drawing:htlx3r6h6au= Goku hair?
Start by studying his hair from different angles and scenes from Dragon Ball. Focus on the direction and shape of each spike and practice creating dynamic lines.
3. Is it difficult to draw Goku in action poses?
It can be challenging, but with a good reference and practice, you’ll improve. Start by sketching out basic forms and gradually add details.
4. What if I don’t have digital drawing tools?
Traditional drawing works just as well! Focus on pencils for sketching and shading, and use colored pencils or markers to add color.
5. How long does it take to get good at Drawing:htlx3r6h6au= Goku?
It varies from person to person, but with consistent practice, you’ll improve over time. Start with simpler poses and gradually work your way to more complex drawings.