Easy:3vz4qc7cf5i= Flowers Drawing are a beautiful and timeless way to express creativity. Whether you’re a beginner looking to explore your artistic side or simply want to add a personal touch to your art, learning how to draw flowers can be both fun and rewarding. This guide will walk you through easy techniques and tips to help you create stunning flower drawings, even if you’re just starting.
Introduction to Flower Drawing
Drawing flowers can seem intimidating at first, but with a few basic techniques, you can create beautiful artwork that captures the essence of nature. Flowers come in all shapes and sizes, making them a versatile subject for artists of all skill levels. From simple daisies to intricate roses, there’s a flower drawing style for everyone.
Why Draw Flowers?
Flowers are a popular subject in art because of their natural beauty and symbolic meanings. They can represent various emotions, such as love, friendship, and peace. Additionally, drawing flowers can be a relaxing and meditative activity, helping you to unwind and connect with nature.
Materials Needed for Easy:3vz4qc7cf5i= Flowers Drawing
Before you start drawing, gather the necessary materials. Here’s a list of basic supplies:
- Pencils: A range of graphite pencils (2B, 4B, 6B) for different shading effects.
- Paper: Smooth drawing paper for easy sketching and shading.
- Eraser: A kneaded eraser for lightening areas and a precision eraser for fine details.
- Inks/Markers: Optional for adding bold outlines or color.
- Colored Pencils: Optional for adding color to your flower drawings.
Basic Techniques for Easy:3vz4qc7cf5i= Flowers Drawing
Let’s start with some fundamental techniques that will help you create simple yet beautiful flower drawings.
1. Understanding Flower Anatomy
Before drawing, it’s essential to understand the basic anatomy of a flower:
- Petals: The colorful, often delicate parts of the flower.
- Stem: The stalk that supports the flower.
- Leaves: The green structures attached to the stem.
- Center: The core of the flower, where the petals originate.
2. Drawing Basic Shapes
Start by sketching simple shapes to outline the flower. For example, draw a circle for the center and oval shapes for the petals. These basic shapes will serve as guides for your final drawing.
3. Adding Details
Once you have the basic shapes, start refining your drawing by adding details. Define the edges of the petals, add texture to the leaves, and sketch the veins in the petals and leaves.
4. Shading and Texturing
Use shading to create depth and dimension in your flower drawing. Lightly shade the areas where the petals overlap or where the light doesn’t hit directly. You can also add texture by using short, quick strokes to mimic the natural patterns in petals and leaves.
5. Final Touches
Review your drawing and add any final touches. Darken the lines where necessary, erase any unnecessary guidelines, and enhance the shading to make your flower drawing pop.
Step-by-Step Guide to Drawing Different Flowers
Now that you’ve learned the basics, let’s explore how to draw a few popular flowers step by step.
1. Drawing a Simple Daisy
- Step 1: Start by drawing a small circle in the center of your paper for the daisy’s core.
- Step 2: Draw oval shapes around the circle to form the petals. Make sure the petals are evenly spaced.
- Step 3: Add a few more layers of petals behind the first layer to give the daisy a fuller appearance.
- Step 4: Draw a straight line down from the core for the stem and add a couple of leaves on either side.
- Step 5: Shade the center and the petals lightly to add depth.
2. Drawing a Tulip
- Step 1: Draw an elongated oval shape for the tulip’s body.
- Step 2: Sketch two curved lines from the top of the oval to form the petals.
- Step 3: Add another petal shape inside the first one to give the tulip depth.
- Step 4: Draw a long, curved line from the bottom of the oval for the stem, and add a leaf on one side.
- Step 5: Shade the tulip petals to highlight their smooth texture.
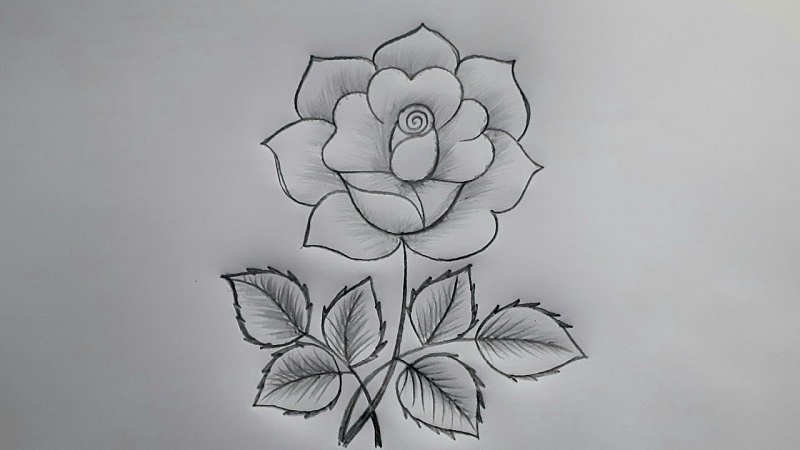
3. Drawing a Rose
- Step 1: Start by drawing a small spiral in the center for the rosebud.
- Step 2: Add layers of curved lines around the spiral to form the petals. Make the lines wavy to mimic the natural folds of rose petals.
- Step 3: Keep adding layers until you reach the desired size of the rose.
- Step 4: Draw the stem with thorns and a few leaves attached.
- Step 5: Shade the rose petals, focusing on the areas where the petals overlap.
4. Drawing a Sunflower
- Step 1: Draw a large circle in the center for the sunflower’s head.
- Step 2: Sketch long, pointed oval shapes around the circle for the petals.
- Step 3: Add a second layer of petals behind the first to make the sunflower look fuller.
- Step 4: Draw a thick stem and add a few large leaves.
- Step 5: Add shading to the center and petals, and create texture in the seeds by adding small dots.
5. Drawing a Lotus
- Step 1: Start with a small oval in the center for the lotus bud.
- Step 2: Draw large, broad petals extending from the bud in a radial pattern.
- Step 3: Add layers of petals behind the first row, gradually increasing their size.
- Step 4: Draw a stem with a few floating leaves around it.
- Step 5: Shade the petals, making the tips lighter to reflect the lotus’s delicate nature.
Tips for Enhancing Your Easy:3vz4qc7cf5i= Flowers Drawing
To take your flower drawings to the next level, consider these tips:
1. Study Real Flowers
Observing real flowers will help you understand their structure, texture, and color. Use them as references to improve accuracy and detail in your drawings.
2. Experiment with Colors
Don’t be afraid to experiment with colors, even if you’re drawing with pencils. Colored pencils can add vibrancy and realism to your flower drawings.
3. Practice Different Flower Types
The more you practice drawing different types of flowers, the more versatile your skills will become. Challenge yourself to draw a variety of flowers, from simple to complex.
4. Use Blending Techniques
Blending is a great way to add smooth transitions between light and dark areas in your drawing. Use a blending stump or your finger to blend the shading for a softer look.
5. Add a Background
Adding a background to your flower drawings can make them stand out. Consider a simple gradient or a scenic background to complement the flowers.
Conclusion
Easy:3vz4qc7cf5i= Flowers Drawing is a delightful way to enhance your artistic skills while connecting with nature’s beauty. Whether you’re drawing simple daisies or intricate roses, the key is to practice and experiment with different techniques. With time and patience, you’ll be able to create stunning flower drawings that capture the essence of these beautiful plants.
FAQs
1. What is the easiest flower to draw for beginners?
The easiest flower to draw for beginners is the daisy. Its simple shape and structure make it an ideal starting point.
2. Can I use colored pencils for Easy:3vz4qc7cf5i= Flowers Drawing?
Yes, colored pencils are great for adding color and depth to flower drawings. They allow for blending and layering, making your drawings more vibrant.
3. How do I make my flower drawings more realistic?
To make your flower drawings more realistic, focus on accurate proportions, detailed textures, and effective shading. Studying real flowers can also help improve realism.
4. What is the best paper for flower drawings?
Smooth drawing paper is ideal for flower drawings, as it allows for precise lines and shading. You can also use textured paper for a different effect.
5. How can I practice Easy:3vz4qc7cf5i= Flowers Drawing regularly?
Set aside time each week to draw different flowers. You can start with simple ones and gradually move on to more complex designs. Using references and tutorials can also aid in your practice. Read More viewdod.
One thought on “Easy:3vz4qc7cf5i= Flowers Drawing: Step-by-Step Guide for Beginners”
Comments are closed.